Case Study: Why We Drew It First – Alumina Fastener Design Verification
Introduction
A client contacted us about alumina fasteners. They did not provide much information—the application and the dimensions of the parts. Initially, it appeared that we just had to manufacture the parts. However, upon closer inspection, it became apparent that even minor mismatches would lead to assembly issues or rework.
As our engineering manager, Lise Ross, noted: "Even with basic specifications, verifying the design first saves a lot of time and material down the line."
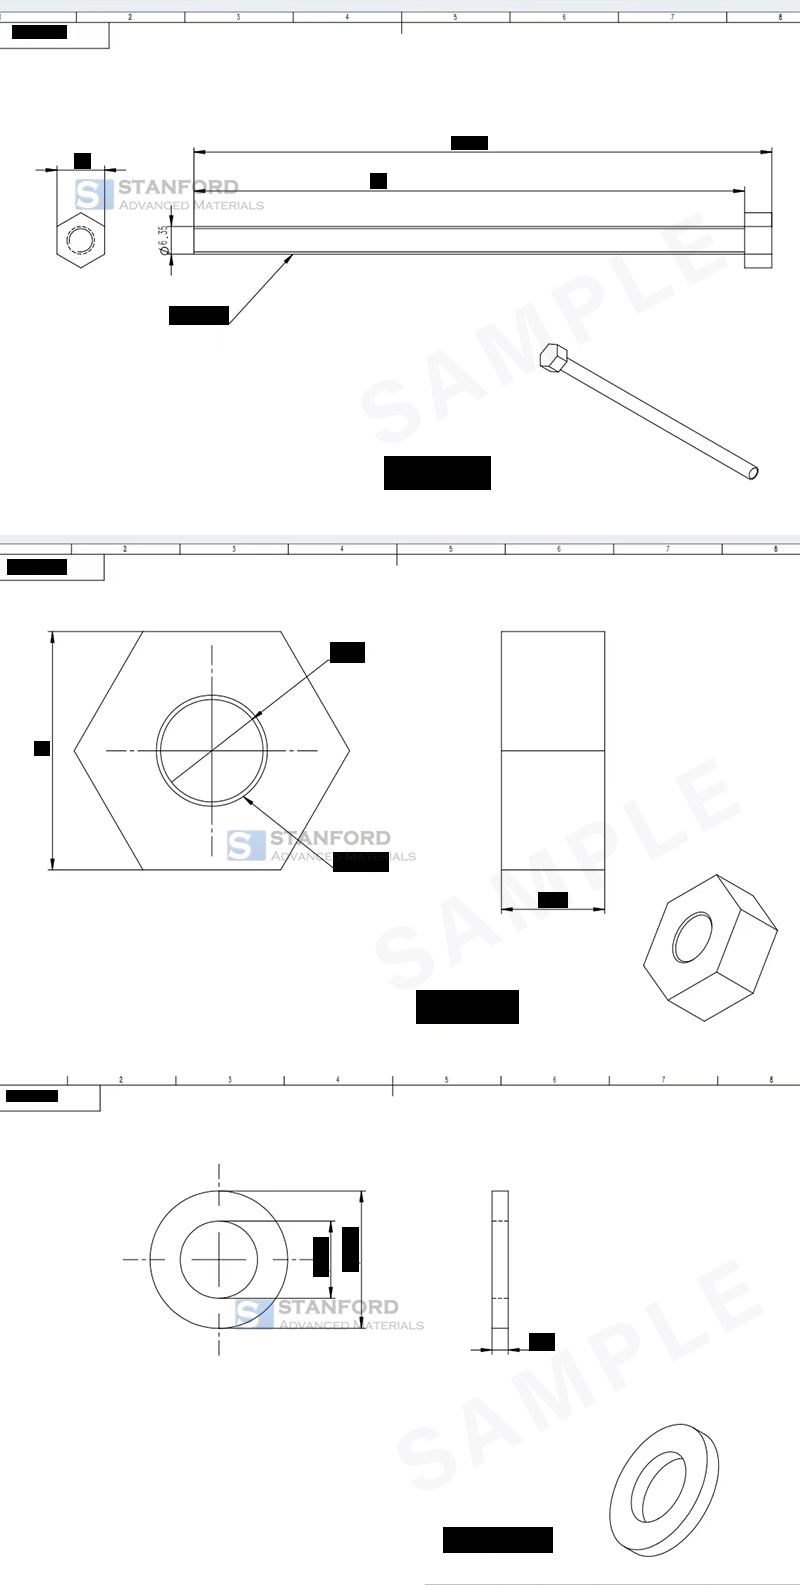
So we took the extra step: instead of going straight to production, we created a 2D drawing for the customer to sign off on. This allowed them to check the shape, hole positions, and general layout before any production occurred.
Problem Overview
Alumina fasteners are used in assemblies where mechanical stability and temperature resistance are important. A minor deviation in shape or hole location can render a part unusable. From just the dimensions and application notes provided by the client, we could not expect everything to fit as planned.
Without exact drawings, the following issues might arise:
-
Fasteners might not fit the intended assembly
-
Material could be wasted on incorrect parts
-
Production schedules could be delayed if rework was needed
Approach / Solution
1. Dimensional checking
We verified the client-provided measurements against standard fastener shape dimensions. We double-checked edges and hole locations for fit to typical assembly orientation.
2. Preparing 2D Drawings
Next, we drew clear 2D schematics, marking key edges, holes, and suggested tolerances. Sensitive dimensions were omitted in the version shared below to maintain confidentiality. The drawings were straightforward but precise, illustrating how the parts would be shaped.

3. Client Confirmation
We sent the drawings to the client for verification. They confirmed the overall shape and main features. Some minor adjustments were suggested, which we implemented before proceeding to production.
The client said, "I didn't expect to receive detailed drawings, since these fasteners are usually standard. SAM's careful preparation made it easy to check everything and really helped us avoid issues."
4. Production and Inspection
After approval, we proceeded to production. In each batch, our team measured the parts with precision and inspected them visually. We were extremely cautious about chamfered edges, hole positions, and other critical features. Whenever we found minute variations, we corrected them on the spot to maintain consistent quality across the batch.
Outcome / Benefits
The fasteners fitted correctly in the assembly on the first attempt, as planned. Because we reviewed the design beforehand, there was no wastage of material on non-standard parts. The customer was satisfied with the thorough process, mentioning that being provided with drawings for inspection before production assured them that all would be good. Generally, the production was successful, and no rework was needed.
Conclusion
Given minimal client specification, such slight extra effort in preparation and checking 2D drawings was invaluable. Checking twice and making corrections before manufacture ensured accurate fit, risk reduction, and built client confidence without additional cost or time loss.
If you require alumina fasteners or other advanced ceramic components of premium quality, Stanford Advanced Materials is ready to assist. Contact us today, and our specialists will guide you through the design verification, prototyping, and production.
Also, explore our aluminium oxide category here for additional high-performance materials.

 Bars
Bars
 Beads & Spheres
 Bolts & Nuts
 Crucibles
 Discs
Discs
 Fibers & Fabrics
 Films
Films
 Flake
Flake
 Foams
Foams
 Foil
Foil
 Granules
 Honeycombs
 Ink
Ink
 Laminate
 Lumps
Lumps
 Meshes
 Metallised Film
 Plate
Plate
 Powders
 Rod
Rod
 Sheets
 Single Crystals
 Sputtering Target
 Tubes
Tubes
 Washer
 Wires
Wires
 Converters & Calculators
 Write for Us


 Chin Trento
